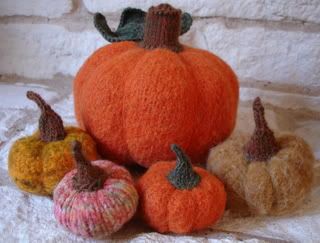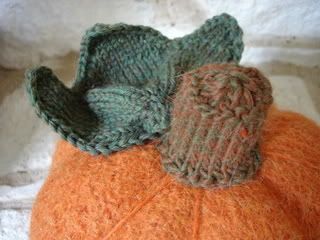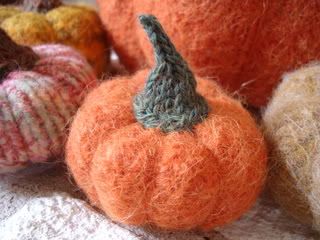

I'm on a felting kick again. This time it's pumpkins. The large pumpkin is made from a pattern I picked up in Utah. Even though the pattern was free, it's copyrighted so I can't share it. But, I can share how I made the small pumpkins since they are creations of mine. They are about the same size of the ornamental gourd pumpkins you can buy in the store this time of year.
MINIATURE FELTED PUMPKIN

Pumpkin:
Yarn: Use any natural fiber yarn that will shrink when washed. I used Cascade Pastaza in Burnt Orange.
Needles: Double point needles in appropriate size. Use a couple of sizes larger than recommended for your yarn. The goal is to create a loosely knitted fabric. US Size 11 is usually good for worsted weight and is what I used.
Cast on 15 stitches and join in the round.
K 2 rnds
Inc 1, k1, inc 1, k2. Repeat to the end of the round. (21 sts)
K 3 rnds
Inc 1, k3, inc 1, k2. Repeat to the end of the round. (27 sts)
K 10 rnds
K2tog, k3, k2tog, k2. Repeat to the end of the round. (21 sts)
K 3 rnds
K2tog, k1, k2tog, k2. Repeat to the end of the round. (15 sts)
K 1 rnd
K2tog around to last stitch, K1 (8 sts)
K2tog around (4 sts)
Cut yarn. Draw through remaining sts to close. Weave in ends. Leave the top of the pumpkin open to add stuffing later.
Felt in the washing machine until desired size is acheived and stitches are no longer visible. There are many ways to shrink your knitting. The way that works for me is to use hot water, a small amount of soap (Eucalan Woolwash), high agitation and the lowest water level setting available. I also throw in an old pair of jeans to help with the agitation. When the felting is finished, I set the machine to the spin cycle for just long enough to remove the excess water, but not long enough to set permanant creases in my knitting.
Stuff the pumpkin while it is still damp so that you can shape it as you want. With a tapestry needle and yarn, sew a running stitch around the opening and draw closed. Using lengths of yarn, form sections by wrapping yarn around pumpkin and drawing tight to shape. Tie knots on the top of the pumpkin. The knots will be hidden by the stem.
Stem
Yarn: Worsted Weight
Needles: US 6 Dpns
Cast on 12 sts. and join in the round.
K 4 rnds
K2tog around (6 sts)
K2tog around (3 sts)
Work I-cord on remaining sts until desired length. Bind off. Weave in ends.
Using a sewing needle and thread, sew stem to top of pumpkin. Use a little stuffing to fill in bottom of stem if desired.
Be creative and have fun with this pattern. Combine different colored yarns together to get a variegated look. Use up those little bits of yarn you've been saving and bust your stash.
Too cute. Thanks for the instructions on the mini pumpkins. I'll have to get some orange yarn... particularly since I'm on a bit of a felting kick. Thanks for sharing and great work!
ReplyDeleteThe pumpkins look amazing! Love the minatures- they look just like the real ones! Those were always my favorites :)
ReplyDeleteThanks for the very cute pattern! Those little pumpkins are too cute and they will stay fresh all year round! Better than the store bought ones :)
ReplyDeleteThese are the cutest pumpkins I have ever seen!!!! I love this!!! Very good work, they look so real.
ReplyDeleteawwww! I believe those are THE cutest pumpkins I have EVER seen!!! I need to raid my stash and see if I have any orange wool. Thanks for sharing your pattern
ReplyDeleteAbsolutely adorable, Tracy! Thanks so much for the pattern!
ReplyDeleteThose are fantastic, Tracy! They'd make such a great centerpiece for Thanksgiving dinner.
ReplyDeleteI love these, Mom! With this and the bowls you're becoming the felting queen.
ReplyDeleteGreat pumpkins, Tracy!
ReplyDeleteCUTE, CUTE, CUTE!!!
ReplyDeleteThose ar so cute. Thanks for sharing!
ReplyDeleteHow nice! Those'll work right up until Christmas time. Great work!
ReplyDeleteThey are so cute, you are a very clever person and so generous in sharing the pattern.
ReplyDeleteLove 'em! Have you ever tried stuffing them before you wash? I know some of the felted toy patterns call for that, and I'm wondering how well it works.
ReplyDeleteThose are so cute. They would fit in nicely with my collection of fruit and veggie Teapots and Pitchers. I have around 32, at last count. I still spy them around them and am tempted but I have run out of room on the wall. Hubby frowns, I walk away kicking myself for not getting it. Felted, well that might be a new twist! Can you do other fruits?
ReplyDeleteGAHH!!! Super Duper CUTE!!! Adorable. Oh, I bet you won't stop making those for a while. No way you could have too many!
ReplyDeleteWhat darling little pumpkins!! Thanks for sharing!
ReplyDeleteI'm officially inspired.
ReplyDeleteThose are TOO CUTE!!! I love the different color combos. Perfect decor for that autumnal table, and what fun to do:D
ReplyDeleteOh wow.. I have looked at these so many times, I love them and was sure I had already left a post saying so, but I don't see it here!
ReplyDeleteSo cute, I'll have to try them. Thanks for the pattern!
these are fabulous!! what a great idea, and its pumpkin season in NY any minute now. thanks for sharing it!
ReplyDeleteI don't think that you SHOULD be finished yet. They are just too cute to stop. I love your pumpkin with made from the varigated yarn.
ReplyDeleteThanks so much for the pattern. I have lots of left over yarn I will be able to use!
ReplyDeleteThanks for the pattern! I have the suspicion that knitting these pumpkins could be come addictive.
ReplyDeleteCompletely addictive. I just finished three LOL. Thanks for sharing the pattern!
ReplyDeleteHi!
ReplyDeleteI'm staff writer at the Lime & Violet Daily Chum (Lime & Violet Daily Chum ( hhttp://www.limenviolet.com/blog/) and I'd like to feature your pumpkin pattern on our blog, displaying one of your pictures to lure people over to your post. If this is okay with you, could you drop me a note at peachy (at) limenviolet (dot) com ? Thanks a lot!
Peachy
So cute! Thanks for the pattern!
ReplyDeleteThose are fabulous little pumpkins! What a great pattern.
ReplyDeleteGiulia
KnitFree
Pebbledashed
Absolutely great these are really pretty thanks for the design.
ReplyDeleteThis is the cutest thing i have seen in ages, i must make some! THANK YOU for the mini-pumpkin pattern!
ReplyDeleteI am not crafty at all but I stumbled upon this post, and I just love these. I'd make them but those instructions may as well have been written in Latin! Oh well...
ReplyDeleteThese are absolutely adorable. Thanks so much for sharing. I'm just learing to knit, and I can't wait to make these as gifts and for myself!
ReplyDeleteThe pumpkins are great but I need one that it is a little bigger. I was wondering if you have the pumpkin pattern name or website from the one you bought at Utah so that I could buy this pattern too.
ReplyDeleteThanks
cyna1@comcast.net
Lovely! I just posted them (with other fags) on my blog. I love the felted ones!
ReplyDeleteOops... I meant to say "favs!"
ReplyDelete